Tutorial/Integration Steps
Tutorial/Integration Steps
This tutorial will help you integrate your service into the Ultra platform. If you dont like to read instructions and want to tinker around first, head over to the demo to open the playground app. You can open it on your browser to understand how the APIs are implemented.
Step 1 - Decide your UI platform
To start building an app on Ultra, lets first decide whether you want to build it on React native platform or on HTML/PWA. Ultra supports both containers. Here's a brief comparison of the platforms.
| React native | HTML |
|---|---|
| Code in JS | Code in JS |
| Awesome performance | Decent performance |
| Very optimized for mobile | Not highly optimized |
| Bundle is delivered from FK CDN, only differential components are downloaded, and is cached within the FK app | Bundle and assets follow cache-control headers and might be slower to render even from cache |
React Native
If you choose React native, Ultra will pull in your react native bundle from your github repository, and then deliver it to Flipkart app over-the-air. React native JS bundles are delivered to Flipkart app via DUS. We highly encourage you to visit the github page to understand how it works.
The only limitations are :
-
You cannot use any other extra native bridges which are not exposed by Flipkart.
-
You cannot use local assets like images/videos within the bundle since only JS is delivered over-the-air. All assets have to be uploaded to your CDN manually and referenced within the JS code.
Once DUS fetches your bundle within the Flipkart app, your react native experience will be loaded within a React Fragment and from there on you can navigate to other pages accordingly.
Webview
If you choose to build via HTML/PWA, then ultra will launch your webpage inside Android's webview. If you have your existing mobile website, you can choose to reuse it for Ultra, by only choosing to make small changes. The only catch is that you are not allowed to navigate away from your main domain.
Step 2 - Integrate JS SDK
Based on the platform you choose, you have to add the Ultra Javascript SDK to your HTML/React-native app. This SDK will provide access to Ultra specific bridge methods needed for Oauth/Login. Once you add the dependency for the SDK, you need to initialize the SDK with your clientId.
Contact flipkart to generate a clientId and secret needed to access Ultra APIs. For playing around with the APIs you can use our test credentials.
Most apps require its users to enter their email address and name before proceeding. We all know that asking the user to login to your app even if he is logged in on Flipkart app is not a good idea. Hence Ultra encourages apps to automatically login the user with their consent.
In this step we will learn how to fetch user details from flipkart securely by asking the user to grant permissions to their data.
This section will also introduce you to terms which are common in the Oauth world like Granted Scopes and Grant tokens.
The first step in fetching user data is to call getToken and supply the list of user resources you like to fetch. This will render the Allow/Deny permission prompt to user, once allowed, the Promise which contains the token is resolved.
When you call getToken the following bottomsheet is shown to the user.
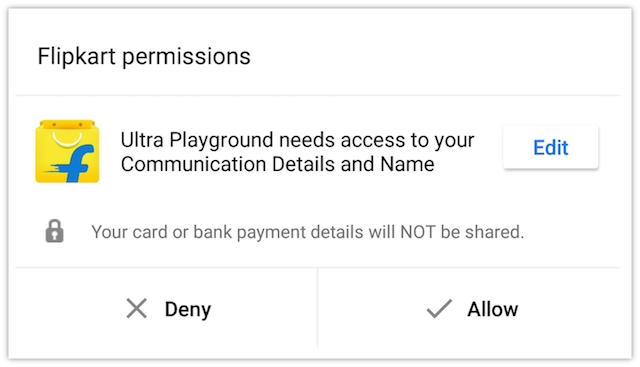
Use flags like shouldVerify and isMandatory (details here) to control whether you want the permission mandatorily and also whether the resources like email and phone should be OTP verfied on Flipkart's end. Most phone numbers on Flipkart systems are OTP verified, so they would not need to verify their phone number within the getToken flow. For users who arent OTP verified, they will be shown a screen to verify their phone numbers before the control comes back to you.
Step 3 - Fetch user data
Send the token to you server using a AJAX call or any other mechanism you prefer. This token can be used by the server to get an access token which we will learn in the next step.
On your server side, use this grant token and fetch the access token by making a call to /1/authorization/auth. More details here.
Use the access token and fetch resources like user.email and user.mobile. More details here.
Note
Although the APIs to fetch user data are available on client side also (since they are REST APIs), make sure you always fetch user data on server side and not on the client side to avoid security risks like MITM attacks.
Step 4 - Auto login the user
Use the value of mobileNumber in combination with the isVerified flag to automatically log the user in. You could now set a cookie which prevents calls to getToken from happening each time the user opens your app. This completes the Login flow. Its highly recommended that you do this towards the end of the user funnel to avoid dropouts.
Step 5 - OMS integration
Once the user has completed payment, the order status details, including order id, order value, fulfilment date etc need to be shared with Flipkart for multiple purposes, like computation of loyalty benefits for Flipkart user, commission calculation etc.
To do this you have to integrate with Flipkart OMS APIs to let us know the status of an Order. A successful payment need not always mean a successful order. Hence a separate API call is required for this. More info here. These flows will also help Flipkart's Customer service agent answer customer queries/calls in a more meaningful manner.
Step 6 - My Orders page
Users should be able to see their orders placed on partner apps via Flipkart app. To support this, partner HTML/PWA or React Native app should provide a "My Orders" page which only shows the orders placed by the customer via the Flipkart app.
Step 7 - Reconciliation Report
In addition to real time order status update via OMS APIs, partner would also need to share the consolidated order statuses on T+1 basis. This report is required to reconcile any mismatches or missing data in Flipkart OMS vs Partner OMS due to any network or technical issues resulting in unsuccessful calls to Flipkart OMS APIs.
This report is to be shared to Flipkart via another OMS API. Please contact us to get the report format/template.
Demo
Checkout the demo page to see this flow in action.